
설치 순서
1. NVIDIA 드라이버 설치
2. CUDA 설치
3. cuDNN 설치
1. NVIDIA 드라이버 설치
1) 사전 설치 요소
sudo apt update && upgrade -y
sudo apt install build-essential gcc ubuntu-drivers-common dkms vim nvidia-modprobe2) Nouveau 비활성화
# nouveau 드라이버를 블랙리스트에 추가
sudo bash -c "echo blacklist nouveau > /etc/modprobe.d/blacklist-nvidia-nouveau.conf"
sudo bash -c "echo options nouveau modeset=0 >> /etc/modprobe.d/blacklist-nvidia-nouveau.conf"

# 아래 명령어로 blacklist-nvidia-nouveau.conf 파일 내용 확인
cat /etc/modprobe.d/blacklist-nvidia-nouveau.conf
blacklist nouveau
options nouveau modeset=0

# 아래 명령어 입력 후 재부팅
sudo update-initramfs -u

# nouveau 실행 확인 -> 아무것도 안뜨면 종료된 것
lsmod |grep nouveau3) 사용가능한 드라이버 찾기
ubuntu-drivers devices

# 출력 결과
== /sys/devices/pci0000:00/0000:00:01.0/0000:01:00.0 ==
modalias : pci:v000010DEd00002230sv000010DEsd00001459bc03sc00i00
vendor   : NVIDIA Corporation
model    : GA102GL [RTX A6000]
driver   : nvidia-driver-535 - distro non-free recommended
driver   : nvidia-driver-525-open - distro non-free
driver   : nvidia-driver-550-open - third-party non-free
driver   : nvidia-driver-470-server - distro non-free
driver   : nvidia-driver-525 - distro non-free
driver   : nvidia-driver-535-server-open - distro non-free
driver   : nvidia-driver-545-open - distro non-free
driver   : nvidia-driver-545 - distro non-free
driver   : nvidia-driver-470 - distro non-free
driver   : nvidia-driver-550 - third-party non-free
driver   : nvidia-driver-535-server - distro non-free
driver   : nvidia-driver-525-server - distro non-free
driver   : nvidia-driver-535-open - distro non-free
driver : xserver-xorg-video-nouveau - distro free builtin4) 원하는 버전 설치 후 재부팅
sudo apt install nvidia-driver-525
sudo reboot5) nvidia-smi로 출력 결과 확인하기
nvidia-smi

# 출력 결과
Thu Feb 29 14:39:19 2024
+-----------------------------------------------------------------------------+
| NVIDIA-SMI 525.147.05   Driver Version: 525.147.05   CUDA Version: 12.0     |
|-------------------------------+----------------------+----------------------+
| GPU  Name        Persistence-M| Bus-Id        Disp.A | Volatile Uncorr. ECC |
| Fan  Temp  Perf  Pwr:Usage/Cap|         Memory-Usage | GPU-Util  Compute M. |
|                               |                      |               MIG M. |
|===============================+======================+======================|
|   0  NVIDIA RTX A6000    Off  | 00000000:01:00.0 Off |                  Off |
| 30%   32C    P8    24W / 300W |     73MiB / 49140MiB |      0%      Default |
|                               |                      |                  N/A |
+-------------------------------+----------------------+----------------------+

+-----------------------------------------------------------------------------+
| Processes:                                                                  |
|  GPU   GI   CI        PID   Type   Process name                  GPU Memory |
|        ID   ID                                                   Usage      |
|=============================================================================|
|    0   N/A  N/A    225915      G   /usr/lib/xorg/Xorg                 64MiB |
|    0   N/A  N/A    225983      G   /usr/bin/gnome-shell                7MiB |
+-----------------------------------------------------------------------------+6) nvidia-smi 를 실행했을 때 Failed to initialize NVML: Driver/library version mismatch 에러 발생시
systemctl isolate multi-user.target
sudo apt --fix-broken install
sudo rmmod nvidia_drm
sudo rmmod nvidia_modeset
sudo rmmod nvidia_uvm
sudo rmmod nvidia
sudo modprobe nvidia
systemctl start graphical.target
nvidia-smi
2. CUDA 설치하기
1) NVIDIA 홈페이지에서 필요한 버전 찾기
https://developer.nvidia.com/cuda-toolkit-archive
CUDA Toolkit Archive
Previous releases of the CUDA Toolkit, GPU Computing SDK, documentation and developer drivers can be found using the links below. Please select the release you want from the list below, and be sure to check www.nvidia.com/drivers for more recent production
developer.nvidia.com
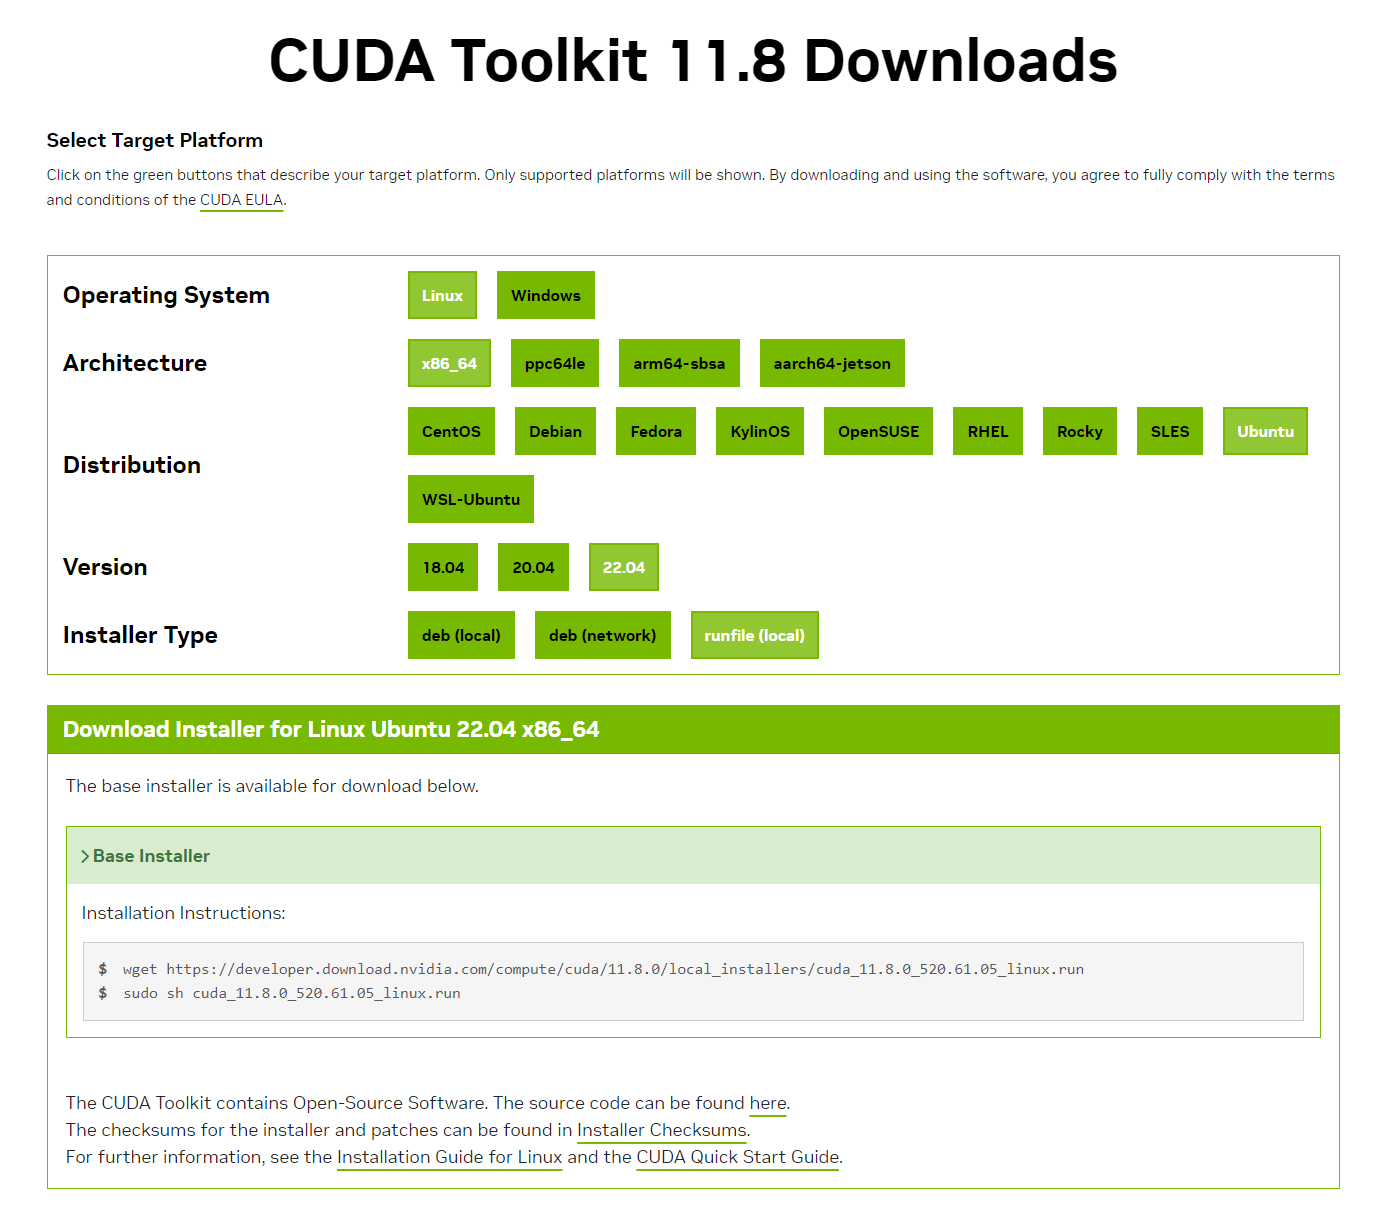
2) 아래 명령어로 설치
wget https://developer.download.nvidia.com/compute/cuda/11.8.0/local_installers/cuda_11.8.0_520.61.05_linux.run
sudo sh cuda_11.8.0_520.61.05_linux.run3) 설치 진행

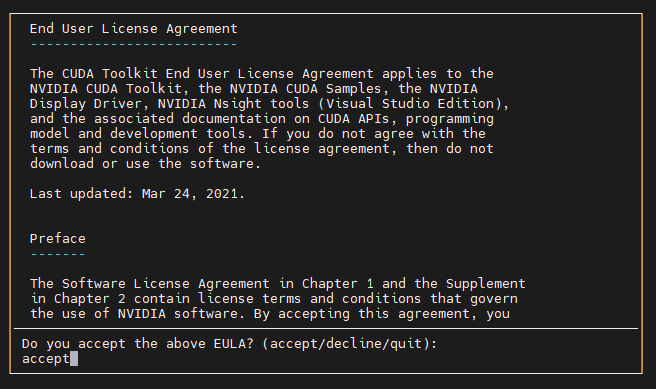

4) Summary 출력 확인
===========
= Summary =
===========

Driver:   Not Selected
Toolkit:  Installed in /usr/local/cuda-11.8/

Please make sure that
 -   PATH includes /usr/local/cuda-11.8/bin
 -   LD_LIBRARY_PATH includes /usr/local/cuda-11.8/lib64, or, add /usr/local/cuda-11.8/lib64 to /etc/ld.so.conf and run ldconfig as root

To uninstall the CUDA Toolkit, run cuda-uninstaller in /usr/local/cuda-11.8/bin
***WARNING: Incomplete installation! This installation did not install the CUDA Driver. A driver of version at least 520.00 is required for CUDA 11.8 functionality to work.
To install the driver using this installer, run the following command, replacing <CudaInstaller> with the name of this run file:
    sudo <CudaInstaller>.run --silent --driver

Logfile is /var/log/cuda-installer.log5) ./bashrc 파일 수정
sudo vim ~/.bashrc
export PATH=/usr/local/cuda/bin:$PATH
export LD_LIBRARY_PATH=/usr/local/cuda/lib64:$LD_LIBRARY_PATHsource ~/.bashrc6) nvcc -V로 버전 확인
nvcc -V

# 출력 결과
nvcc: NVIDIA (R) Cuda compiler driver
Copyright (c) 2005-2022 NVIDIA Corporation
Built on Wed_Sep_21_10:33:58_PDT_2022
Cuda compilation tools, release 11.8, V11.8.89
Build cuda_11.8.r11.8/compiler.31833905_0
3. cuDNN 설치하기
1) 아래 경로에서 원하는 cuDNN 버전 찾아서 다운로드 ( tar 파일 )
https://developer.nvidia.com/rdp/cudnn-archive
cuDNN Archive
Download releases from the GPU-accelerated primitive library for deep neural networks.
developer.nvidia.com

2) 다운로드 파일 압축 풀기
tar -xvf cudnn-linux-x86_64-8.9.4.25_cuda11-archive.tar.xz3) 압축 푼 경로로 이동
cd cudnn-linux-x86_64-8.9.4.25_cuda11-archive/4) /usr/local/cuda 경로로 파일 복사
sudo cp include/cudnn*.h /usr/local/cuda/include
sudo cp lib/libcudnn* /usr/local/cuda/lib645) 설치된 cuDNN 버전 확인
cat /usr/local/cuda/include/cudnn_version.h | grep CUDNN_MAJOR -A 2

# 출력 결과
#define CUDNN_MAJOR 8
#define CUDNN_MINOR 9
#define CUDNN_PATCHLEVEL 4
'dev' 카테고리의 다른 글
| [Jetson] Jetson Orin Nano SSD에 Jetpack 설치 (SDK Manager 사용) (5) | 2024.04.18 |
|---|---|
| YOLO-NAS 로그 확인하기(텐서보드) (0) | 2024.03.08 |
| YOLO-NAS 커스텀 데이터 학습시키기 (0) | 2024.03.07 |
| YOLOv9 예제 (0) | 2024.03.01 |
| YOLO-NAS 예제 (0) | 2024.02.29 |